Developing Program to Read Texts From Monitor Screen Using Python
How to build your first Desktop Application in Python
Search the entire internet for uses of the Python programming language and they list them with Desktop Applications marked as not very suited with python. But years ago in 2016 when I was hoping to move on from web development to software evolution, Google.com told me I should choose python because it is used to build some modernistic and avant-garde scientific applications, then they mentioned blender3d. I knew blender3d, it is an awesome 3d cosmos software. love
Only its not their error, the ugly things people are using as showcases for python GUIs are insufferable, too old, and also expired looking windows, no young person would like that. I hope to change that notion with this simple desktop app tutorial. Lets get going.
Nosotros will exist using PyQt (more on that presently) instead of Tkinter which was near removed from the list of python standard libraries for being outdated.
What is PyQt (pronounced: pie-cute). It is one of the 2 ports of a framework, Qt (pronounced: cute) from C++, . That framework is known every bit the necessary framework for C++ developers. It is the framework behind blender3d, Tableau, Telegram, Anaconda Navigator, IPython, Jupyter Notebook, VirtualBox, VLC etc. Nosotros volition employ it instead of the embarrassing Tkinter.
The two ports of Qt are PySide and PyQt. They are both 99% alike. PyQt is the easiest of the two to install.
Prerequisites
- You should already know some python basics
- You should know how to install packages or libraries with pip
- You should already have python installed, of course.
Installation
The only affair nosotros volition need to install is PyQt. And then open up your terminal, on windows it volition be the Command Prompt or Powershell.
Type the control below into your last
>>> pip install PyQt6 PyQt6 considering we are downloading the version half dozen of PyQt. Wait for the installation to complete it will only take like a minute or two.
Project Files and Folders
At present that nosotros are done with the installation. We should start with our project. Create a project binder for the app, we going to phone call it: helloApp. Create it anywhere you want on your reckoner, only its proficient to be organised.
Lets do a "Hello World"
Open up the master.py, preferably in vscode and enter the following lawmaking
main.py
            import sys
import os            from PyQt6.QtGui import QGuiApplication
from PyQt6.QtQml import QQmlApplicationEngine
from PyQt6.QtQuick import QQuickWindow
QQuickWindow.setSceneGraphBackend('software')            app = QGuiApplication(sys.argv)            engine = QQmlApplicationEngine()
engine.quit.connect(app.quit)
engine.load('./UI/main.qml')            sys.exit(app.exec())
In the code above; we import sys, os, QGuiApplication and QQmlApplication modules.
The QQuickWindow.setSceneGraphBackend('software') should be included in your code as a fallback option for uses with former hardware specs, other than that they would encounter an error information as seen below:
                          >>> Failed to create vertex shader: Error 0x80070057: The parameter is wrong.
>>> Failed to build graphics pipeline state
Likewise the lawmaking calls QGuiApplication and QQmlApplicationEngine Which will use Qml instead of QtWidgets as the UI layer for the Qt Application. Information technology so connects the UI layers quit part with the app's main quit function. So both can close when the UI has been closed by the user. Next it loads the qml file as the qml code for the Qml UI. The app.exec() is what runs the Application, it is within the sys.exit because it returns the exit code of the Application which gets passed into the sys.exit which exits the python sytem.
Add this code to the main.qml
main.qml
            import QtQuick
import QtQuick.Controls.Bones            ApplicationWindow {
              visible: truthful
              width: 600
              height: 500
              championship: "HelloApp"                          Text {
              anchors.centerIn: parent
              text: "How-do-you-do World"
              font.pixelSize: 24
              }            }
The above code creates a Window, the visible code is very important, without that the UI is going to run but will be invisible,with width and meridian every bit specified, with a title of "HelloApp". And a Text that is centered in the parent (which happens to be the window), the text displayed is "Hello World", a pixel size of 24px.
In the previous Qt5, the import codes above would have included version numbers as
            import QtQuick 2.15
import QtQuick.Controls 2.15
Also, in Qt6 nosotros explicitly declare a mode for the Controls equally
import QtQuick.Controls.Basic more about Controls styles after
If you accept the above, yous can run information technology and see your event.
Navigate into your helloApp folder
>>> cd helloApp Now run it by doing:
>>> python main.py If your code runs, you should see:

Update UI
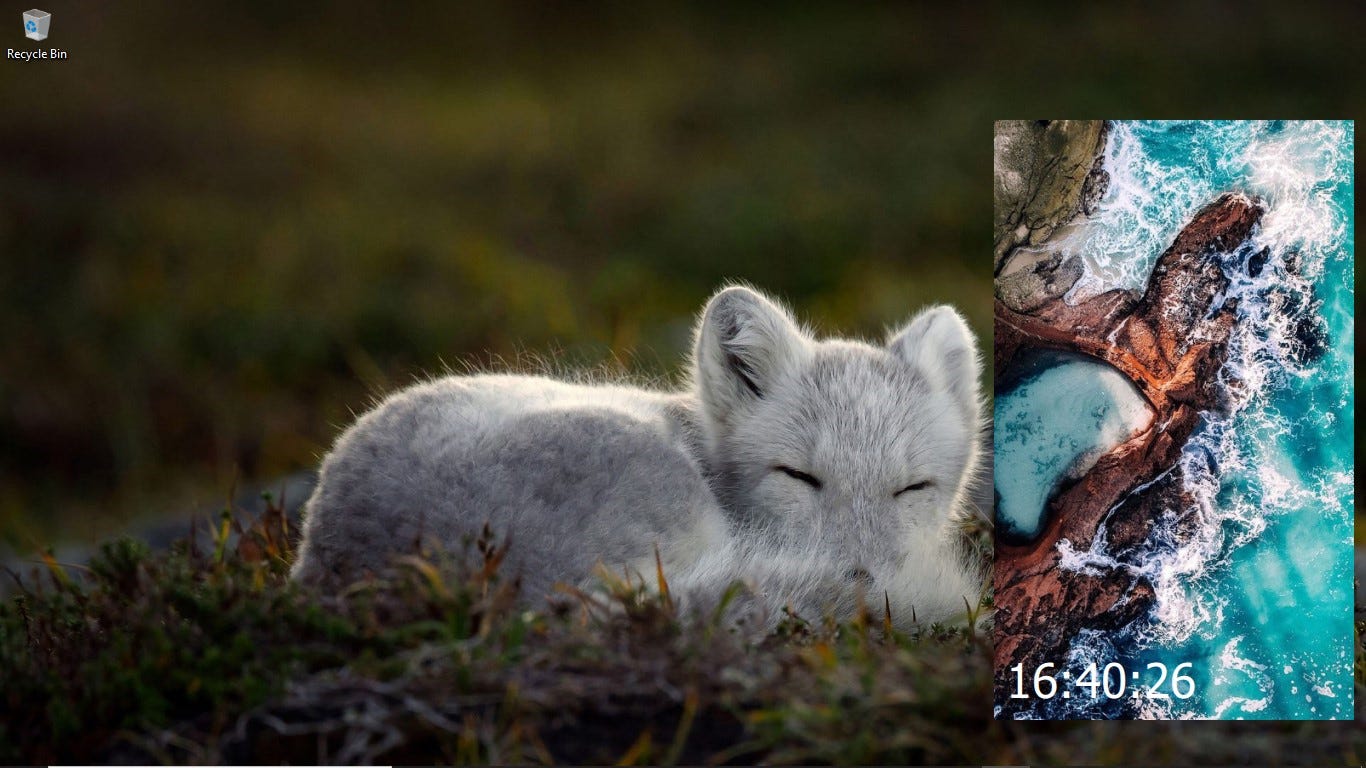
Now lets update a UI a little fleck, lets add an paradigm as a background and a text that will have a fourth dimension
            import QtQuick
import QtQuick.Controls.Basic            ApplicationWindow {
              visible: true
              width: 400
              height: 600
              title: "HelloApp"                          Rectangle {
              anchors.fill:              parent                                      Image {
              sourceSize.width:              parent.width
              sourceSize.summit:              parent.tiptop
              source: "./images/playas.jpg"
              fillMode: Image.PreserveAspectCrop                          }                          Rectangle {
              anchors.fill up:              parent
              color: "transparent"                          Text {
              text: "16:38:33"
              font.pixelSize: 24
              color: "white"
              }                          }                          }
}
The above has an ApplicationWindow blazon, a Rectangle type inside information technology, that is actually filling upwardly all the space of the window. At that place is an Prototype within of it, and a another Rectangle that looks like its abreast information technology, but considering of the non-existence of a Layout blazon, its actually on top of the Paradigm blazon. The Rectangle has a color of transparent since by default Rectangles are white, there is a Text inside of it that reads 16:38:33, to mock up time.
If you run the app the text volition appear at the top-left corner of the Window. We do not similar that, and and so we are going to make information technology appear at the bottom-left corner with some margins instead.
In your qml code, update the Text blazon to include anchors equally shown below:
                          ...                          Text {
              anchors {
              bottom: parent.lesser
              bottomMargin: 12
              left: parent.left
              leftMargin: 12                          }
              text: "sixteen:38:33"
              font.pixelSize: 24
              ...
              }                          ...
Now run it by doing
>>> python main.py You lot should see something similar to this.

Now I would like the fourth dimension to update
Utilise real time
Lets use a real time. Python provides us with native functions that give us all kinds of time and appointment related functions. We desire a string with the current time. gmtime provides you with global time struct with all kinds of information and strftime constructs certains portions of the time equally a string using the gmtime function
import the strftime, and gmtime functions
principal.py
            import sys
import os
from fourth dimension import strftime, gmtime            from PyQt6.QtGui import QGuiApplication
...
Then construct your time string below the imports, anywhere in the file
chief.py
curr_time = strftime("%H:%M:%S", gmtime()) The %H, %Grand, %S, tells strftime , that nosotros want to run into Hours(24-hour type), minutes, and seconds. (Read more about format codes for strftime hither ). This variable will be passed on to the qml layer.
Lets create a holding in qml that we can use to receive time string. This variable makes it easier to modify the fourth dimension. Lets phone call this belongings currTime
main.qml
            ...            ApplicationWindow {
              ...
              title: "HelloApp"                          property string currTime: "00:00:00"
              ...
Employ this property in the qml, so when this value changes all the other places where information technology has been used as well volition change.
principal.qml
            ...            Text {
              ...
              text:              currTime  // used to be; text: "16:38:33"
              font.pixelSize: 48
              colour: "white"
}            ...
Now send our curr_time variable we created in python to qml by setting it to the currTime qml property.
main.py
            ...            engine.load('./UI/primary.qml')
engine.rootObjects()[0].setProperty('currTime', curr_time)            ...
The to a higher place code will prepare the qml property currTime to the value of the curr_time python holding. This is one way nosotros pass data from python to the UI layer.
Run the app and you should come across no errors and volition also have the current time. Hooray!!! Onward!!!
Update the time
To keep our time updated. We volition demand to employ threads. Threading in python is like shooting fish in a barrel and straightforward, we will utilise that instead of Qt's threading. Thread uses functions or thread calls a function. I prefer we use a technique in Qt known every bit signals, this is a professional method, and studying information technology know will brand your like better and easier. Lets put our electric current time code into a function, utilize underscore(_) for the file name. I will explicate why afterward. Information technology is non a requirement or anything, it is just good practice
To use signals nosotros would have to subclass QObject, straightforward.
Create a subclass of QObject, phone call information technology whatever you similar. I will call it Backend.
main.py
            ...
from PyQt6.QtQuick import QQuickWindow
from PyQt6.QtCore import QObject, pyqtSignal
form Backend(QObject):                          def __init__(self):
              QObject.__init__(self)            QQuickWindow.setSceneGraphBackend('software')            ...
The higher up code imports QObject and pyqtSignal , in pyside this is called Signal . It is one of the few differences betwixt pyqt and pyside.
Formally, we had a property string that received our curr_time string from python, now we create a property QtObject to receive the Backend object from python. There are not that many types. Qml converts python base types into bool, int, double, string, list, QtObject and var. var can handle every python type, but its the least loved.
chief.qml
            ...
property cord currTime: "00:00:00"
property QtObject backend
...
The above lawmaking creates a QtObject backend to concord our python object back_end. The names used are mine, feel costless to modify them to whatever y'all similar
In the python pass it on
main.py
            ...
engine.load('./UI/master.qml')
back_end = Backend()
engine.rootObjects()[0].setProperty('backend', back_end)
...
In the in a higher place code an object back_end was created from the course Backend . Nosotros then set it to the qml property named backend
In Qml, one QtObject tin receive numerous functions (called signals) from python that does numerous things, but they would accept to exist organised under that QtObject.
Create Connections type and target it to backend. Now inside the Connections blazon can exist functions as numerous equally we desire to receive for the backend.
chief.qml
            ...
Rectangle {
              anchors.fill up:              parent                                      Epitome {
              ...
              }
              ...            }            Connections {
              target:              backend
              }
...
At present thats' how we connect with the python signals.
If we practise not use threading our UI will freeze. Its quite emphatic to land that what we need here is threading and not multiprocessing.
Create two functions, i for the threading 1 for the actually function. Here is where the underscore comes in handy.
principal.py
            ...
import threading
from fourth dimension import slumber
...
                        class Backend(QObject):
              def __init__(self):
              QObject.__init__(self)                          def bootUp(cocky):
              t_thread = threading.Thread(target=self._bootUp)
              t_thread.daemon = True
              t_thread.showtime()                          def _bootUp(self):
              while True:
              curr_time = strftime("%H:%M:%S", gmtime())
              print(curr_time)
              slumber(i)            ...
The in a higher place code has an underscore role that does the work creating an updated fourth dimension.
Create a pyqtsignal called updated and call information technology from a function chosen updater
master.py
            ...
from PyQt6.QtCore import QObject, pyqtSignal            ...                          def __init__(self):
              QObject.__init__(self)                          updated = pyqtSignal(str, arguments=['updater'])                          def updater(self, curr_time):
              self.updated.emit(curr_time)                          ...
In the above code the pyqtSignal, updated , has as it arguments parameter the list containing the proper name of the role 'updater'. From this updater function, qml shall receive data. In the updater part we phone call( emit ) the signal updated and laissez passer information ( curr_time ) to information technology
Update the qml, receive the indicate by creating a point handler, a signal handlers name is the capitalised form of the point proper name preceded by 'on'. And then, 'mySignal' becomes 'onMySignal' and 'mysignal' becomes 'onMysignal'.
main.qml
            ...
              target:              backend                                      office onUpdated(msg) {
              currTime              =              msg;
              }
...
In the above code you can come across the indicate handler for updated betoken is called onUpdated . It is too has the curr_time passed to it as msg .
All is well but we are nevertheless to call the updater function. Having a seperate function to call the indicate is non necessary for a small application every bit this. But in a big awarding, it is the recommended manner to practise it. Change the delay seconds to 1/ten of a second. I have constitute this effigy to the best to update time.
main.py
                          ...
              curr_time = strftime("%H:%M:%S", gmtime())
              self.updater(curr_time)
              sleep(0.1)
...
The bootUp office should exist called immediately after the UI has loaded.
            ...
engine.rootObjects()[0].setProperty('backend', back_end)            back_end.bootUp()            sys.get out(app.exec())
All is done!!!
Run the lawmaking:
>>> python main.py
Bonus:
Make the Window Frameless
You can brand the window frameless and stick it to the lesser right of the Screen.
main.qml
            ...
summit: 600
10:              screen.desktopAvailableWidth -              width              - 12
y:              screen.desktopAvailableHeight -              peak              - 48
title: "HelloApp"            flags:              Qt.FramelessWindowHint |              Qt.Window            ...
The to a higher place code sets ten , y for the window and add flags , to make the window frameless. The Qt.Window flag ensures that fifty-fifty though the window is frameless, we still get a Taskbutton
Run it, and you lot should be glad with what you encounter.
>>> python main.py
At long last, the coding has ended and here are the terminal codes.
main.py
            import sys
import bone
from time import strftime, gmtime
import threading
from time import sleep            from PyQt6.QtGui import QGuiApplication
from PyQt6.QtQml import QQmlApplicationEngine
from PyQt6.QtQuick import QQuickWindow
from PyQt6.QtCore import QObject, pyqtSignal
class Backend(QObject):
              def __init__(self):
              QObject.__init__(self)                          updated = pyqtSignal(str, arguments=['updater'])                          def updater(self, curr_time):
              self.updated.emit(curr_time)                          def bootUp(self):
              t_thread = threading.Thread(target=self._bootUp)
              t_thread.daemon = Truthful
              t_thread.start()                          def _bootUp(cocky):
              while True:
              curr_time = strftime("%H:%One thousand:%S", gmtime())
              self.updater(curr_time)
              slumber(0.one)
QQuickWindow.setSceneGraphBackend('software')            app = QGuiApplication(sys.argv)
engine = QQmlApplicationEngine()
engine.quit.connect(app.quit)
engine.load('./UI/main.qml')            back_end = Backend()            engine.rootObjects()[0].setProperty('backend', back_end)            back_end.bootUp()            sys.exit(app.exec())
main.qml
            import QtQuick
import QtQuick.Controls.Basic            ApplicationWindow {
              visible: true
              width: 360
              peak: 600
              ten:              screen.desktopAvailableWidth -              width              - 12
              y:              screen.desktopAvailableHeight -              pinnacle              - 48
              title: "HelloApp"                          flags:              Qt.FramelessWindowHint |              Qt.Window                          property string currTime: "00:00:00"
              property QtObject backend                          Rectangle {
              anchors.fill:              parent                                      Image {
              sourceSize.width:              parent.width
              sourceSize.height:              parent.acme
              source: "./images/playas.jpg"
              fillMode: Paradigm.PreserveAspectFit
              }                          Text {
              anchors {
              lesser: parent.bottom
              bottomMargin: 12
              left: parent.left
              leftMargin: 12
              }
              text:              currTime
              font.pixelSize: 48
              colour: "white"
              }                          }
              Connections {
              target:              backend                                      function onUpdated(msg) {
              currTime              =              msg;
              }
              }            }
Apart from the names that you may have changed, everything should be like.
Build and next steps
Building a pyqt application could be the easiest, since information technology is widely known.
To build, install pyinstaller, since building is a office of the bonus section, we didn't install it earlier.
>>> pip install pyinstaller We could have easily done run the post-obit code in the applications folder (helloApp) but, nosotros take to take intendance of the resources that we used.
>>> pyinstaller main.py Instead, first do:
>>> pyi-makespec main.py It generates a spec file for you lot to update first, then you can run pyinstaller once more
The datas parameter can be used to include data files in your App or App's binder. Its a listing of tuples, and the tuple e'er has two items, the target path, we will be including, and the destination path, where information technology should exist stored in the Application'south folder. The destination path must exist relative. If you lot want it placed right there with the app's executables, you make information technology an empty string (''), if y'all want information technology to be in a nested folder within the application's folder, yous specify the nested binder ('nest/nested/really_nested')
Update the datas parameter like you see below to match the path to your helloApp's UI folder on your computer.
Set the console parameter to False, since this is a Gui and we are not testing it.
main.spec
            ...
a = Analysis(['master.py'],
              ...
              datas=[('I:/path/to/helloApp/UI', 'UI')],
              hiddenimports=[],
...
exe = EXE(pyz,
              a.scripts,
              [],
              ...
              name='chief',
              debug=Simulated,
              ...
              console=False )
coll = COLLECT(exe,
              ...
              upx_exclude=[],
              proper noun='primary')
The name parameter in the EXE call is the name of the executable itself. eg. master.exe, or master.dmg but the proper name parameter in the COLLECT phone call is for the folder name in which the executable and all its accompanying files will be stored, both can exist changed. Only the names were based on the file we used to generate the spec, remember: 'main.py'
Finally, build your application using
>>> pyinstaller main.spec Now yous should see a binder named 'dist' with another binder within information technology named 'main' with the awarding files. Search for the main.exe, or principal executable and run it. TADAAA! And all is well.

Next Steps
Apart from the style that the UI folder was included and used in the application, all of the things we've talked about are used in product. Resources are bundle before being deployed in production.
But the Signals, how the background epitome was used, to the frameless window are all techniques used in product and so to speak, in existent-world. Its simply that there is more to information technology. Yes there is more to frameless Windows, you lot accept to handle the titlebar, the resizing and dragging of the window among other things if you are not going to use information technology as a splash screen, non that complex, only it goes beyond the scope of this tutorial.
Qml is a lot more than than Images, Rectangles and Text, and the Layout system are iv types. They are easy to study, but practical approach is the best, and so I take not bothered to explicate them.
Go on with PyQt and Qml, it will atomic number 82 into a career in software development, embedded systems, and in the time to come Data visualization. Adopt it over TKinter, its popularity keeps increasing by the day.
Developing Program to Read Texts From Monitor Screen Using Python
Source: https://medium.com/analytics-vidhya/how-to-build-your-first-desktop-application-in-python-7568c7d74311
0 Response to "Developing Program to Read Texts From Monitor Screen Using Python"
Post a Comment